· Salesforce Guide · 7 min read
Salesforce Email Domain Verification: Comprehensive Guide
Salesforce now requires verification for all email-sending domains. Here are the enforcement dates, risks, and exact setup steps.
Salesforce is requiring organizations to verify the domains used to send email from within Salesforce. If you don’t verify a domain and try to use it for sending emails in Salesforce, those emails will never be delivered.
As of April 27th, this requirement is now in effect.
Skip Ahead
Why This Requirement Exists
Salesforce wants to prevent impersonators from using your email address in emails they send on the Salesforce platform.
They are essentially saying, “Before we let you send an email as a certain address, prove that you own that address.”
Most Salesforce implementations already have some form of email verification set up, otherwise emails were very likely to go to spam.
If you are not sure what is already configured in your org, we’ll start with a review.
Review Your Org’s Settings
Let’s see how your emails are configured to be sent with Salesforce. We’ll check several settings under Setup.
1) Email Relay
Emails may not be sent through Salesforce directly. If you have see you have Email Relay set up, check your Domain Filters and make note of those domains.
You do not need to worry about Email Verification for domains that are using Email Relay, since those emails flow through your email server instead of Salesforce.
You need to make sure all email-sending domains are either accounted for here in Email Relay or with DKIM.
2) Authorized Email Domains
This is an older method. It is not the recommended long-term approach, but it still meets Domain Verification Salesforce requirements if you have it active.
3) DKIM
Review which domains are currently configured for DKIM signing and which still need to be added. If they have been added as DKIM Keys, ensure the status is ‘Active’ for each necessary domain.
4) Deliverability
As an additional check, you can run the Domain Verification Check for any domains to confirm if they meet the email verification requirements or not.
5) Review Emails Currently in Use
We will check two areas to see what emails are set up and in use in your org.
First, under setup go to Email Log File.
Export an Email Log File with outbound emails only.
In the CSV file that generates:
- Add filters to the first row.
- Filter Mail Event by
D(delivery), since this is the part we care about. - Review the Sender column.
If you see sender values ending in bnc.salesforce.com, that means Salesforce is handling bounce management. As long as you use DKIM, you are fine to keep bounce management active.
For encoded sender values, like info=techtitanconsulting.com__7x4y01kg7ddfba1u@phkey0r6s4we.u-il8bmas.usa346.bnc.salesforce.com , look at the first part of the email and replace = with @, then focus on the domain portion.
You can use this Excel formula to isolate the domain portion:
=MID(E1,FIND("=",E1)+1,FIND("__",E1)-FIND("=",E1)-1)This helps identify all unique sending domains currently in use. Some orgs have one domain; many have several.
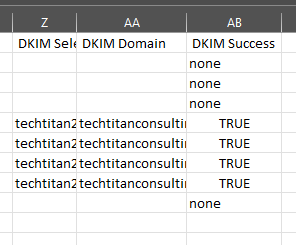
If DKIM is already enabled and you want to check for gaps, filter rows where DKIM Success is none.
If you see emails sent from noreply@salesforce.com and DKIM is none (failing), set one of your Org-Wide Email Addresses as the default from address.
Finally, check your Organization Wide Addresses for any active emails. These are likely ones you will want to verify since they are available to be used by users.
Setup
Now that you have confirmed your current setup and all domains in use, complete any missing steps in your implementation.
We will go through a setup from scratch.
DKIM
- In Salesforce Setup, go to
DKIM Keys. - Click
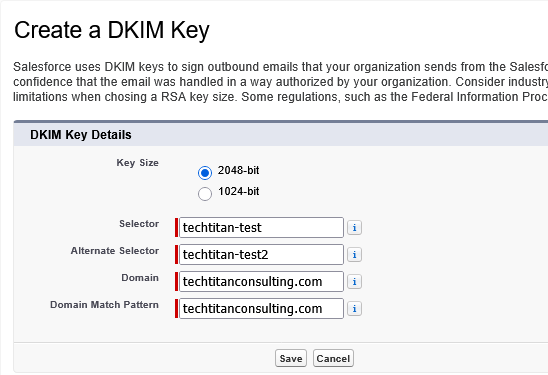
Create New Key. - Fill in the DKIM Key Details:
- Selector: a unique key to identify this particular DKIM key. Include the environment (prod or sandbox), in case you would like to differentiate these more easily on the DNS side.
- Alternate Selector: An additional unique name. Use the first Selector + 2. This Alternate Selector allows Salesforce to automatically rotate your DKIM keys.
- Domain: The domain part of your email address, example
techtitanconsulting.com - Domain Match Pattern: If you are using subdomains, like
guide.techtitanconsuling.com, you can enter each one separately here or use a wildcard to allow all subdomains:*.techtitanconsulting.com. If you are not using subdomains, simply enter the same Domain as the step prior:techtitanconsulting.com
DNS
Once you have created the DKIM Key, you will need to wait up to a minute for Salesforce to add its own TXT records. When you refresh the DKIM Key Details page, eventually you will see this message. The TXT Record Status will show Published.
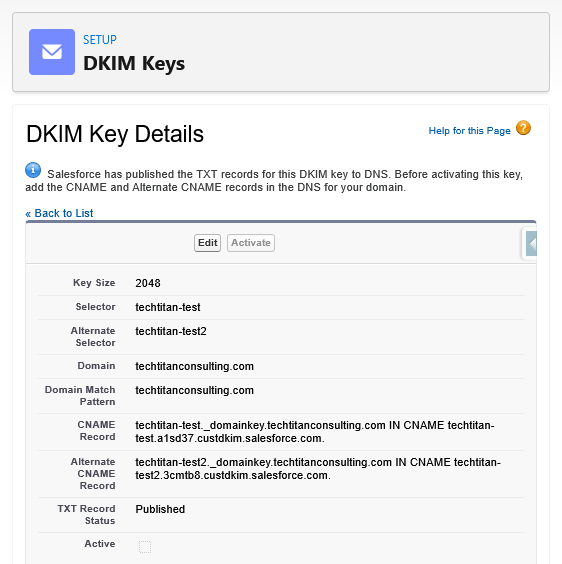
- Copy the CNAME Record and Alternate CNAME Record values
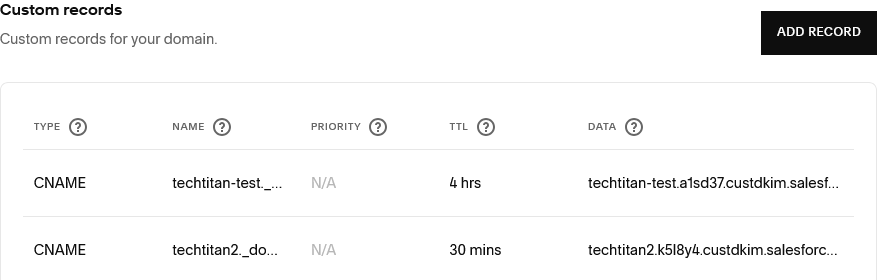
- Either add these as CNAME records in your organization’s DNS provider, or send them to your IT team to do so.
- Understanding the CNAME values listed in Salesforce:
- The first part of the value is your name/host/hostname (all providers call it something different). Some providers do not need the domain to be provided at the end.
- The second part of the value is the data/value/points to.
- Example CNAME Record in SF:
- ‘yourcompany-prod._domainkey.techtitanconsulting.com IN CNAME techtitan-test.a1sd47.custdkim.salesforce.com.’
- In Squarespace Domains, we enter ‘yourcompany-prod._domainkey’ (remove the domain at the end) as the Name and ‘yourcompany-prod.a1sd47.custdkim.salesforce.com’ as the Data when creating the CNAME Record.
- Be sure that both CNAME records get added: the main and the alternate.
- Wait for DNS propagation if needed (usually this is immediate, but depending on your email infrastructure could take up to 48 hours)
- In Salesforce, you can verify if the DNS step was completed and propagated by refreching the DKIM Key Details Page. You should see a green check box and the message ‘This DKIM key is ready for activation.’
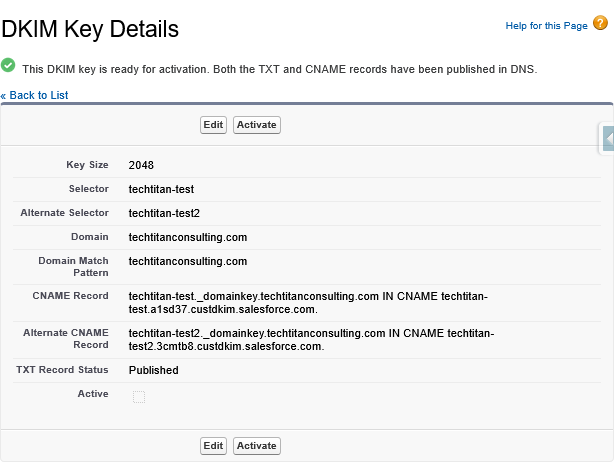
- Click Activate on the DKIM Key Details page.
- Send a test email. If you send it to a gmail account, you can easily go into the Email’s Details > Show Original > and See that DKIM is Passing. You can also pull an Email Log and verify that the DKIM Success column says TRUE.
- Make sure that you have covered any possible domains that your org is using to send emails - repeat steps 1-6 for all domains.
Other Gotchas
Bounce Management
- If you use DKIM, you can keep Bounce Management turned on.
- If you are using the Authorized Email Domains option instead of DKIM, you will need to turn Bounce Management off in Deliverability.
Default No Reply Address
- Certain emails (like Chatter Case Notifications) use the default
noreplyaddress. If no default noreply address is set up in Organization Wide Addresses, it will use a salesforce.com email that does not pass the email verification. Make sure you have a default address configured under Org-Wide Email Addresses, otherwise Case Notification related emails will not be delivered.
Verifying DNS
- If you do not see the option to activate DKIM in Salesforce, you can investigate using a DNS lookup tool. Run a CNAME lookup using the Name part of the CNAME value in Salesforce, example, ‘techtitan-test._domainkey.techtitanconsulting.com’.
- If no DNS record is found when searching that, try adding the domain to the end again. Since some Domain providers already add the domain on to the end, sometimes it can end up on their twice. If a record is found for that, it means the DNS CNAME record name needs to not have the domain part at the end, just up to ‘_domainkey’
Verifying in Sandboxes
- Everytime a sandbox is refreshed or created, the DKIM and CNAME setup will need to be completed in order to fully test emails.
- However, you can still perform testing in sandboxes without verifying emails by enabling a new setting. See more right below:
Domains that Can’t be Verified
- Salesforce has added an setting to be able to send without verifying domains for cases like consultants who will not configure their domain with your company’s DNS.
- This could also be useful in sandboxes to complete testing so that you do not have to set up a new DKIM and CNAME records everytime you create a sandbox.
- If needed, go to
Setup > Deliverability > Enable 'Use a substitute email address for unverified domains'. - Note that this is an org-wide setting. If you choose to enable it in production, be sure to intermittently run Email Log exports to ensure all your essential emails are verified. Even if emails get sent, if they are not verified they are likely to end up in spam.
Need help getting Salesforce domain verification set up?
We'll audit your current email setup, identify gaps, and help your team implement DKIM and DNS updates without disrupting deliverability.
For the full 2026 security package beyond domains, see:
Salesforce Security Changes 2026: Deadlines, Risks, and What To Do